In December I made this video from my summer trip to Lapland. I was not very satisfied with it, though the main problem was that I messed up some clips by filming them with too fast a shutter speed (newbie mistake). Also loosing my tripod head in the beginning of the trip led limited the possible filming angles.
When I got the Sony Vegas Movie Studio 11, I though about giving another shot at the fairly limited raw material. The result is seen here.
I'm not fully satisfied with this one either. The uneven motion caused by using too fast a shutterspeed is very visible in some places and even seems to have become worse in the Vimeo version. The few places where I'm holding the camera while riding look rather unsharp after having been processed with the Vegas stabilizer tool.
Comments? Which one is better and why? What could be improved?
Showing posts with label Video. Show all posts
Showing posts with label Video. Show all posts
Wednesday, April 25, 2012

Tuesday, April 10, 2012
Camera support for video
For photography I have three different tripods for different purposes. The smallest one is a GorillaPod that holds a compact system camera with a big zoom, but not much else. It can be wrapped around branches and narrow tree trunks, which makes it quite versatile. The next one is a small Slik Sprint Mini II GM, which is stable when extended up to 1 meter, but not much more. I've used it quite a lot, and this is the one I bring when going out for a bike ride. Trying to attach some sort of pan head would be too much, though. My big tripod is an ancient Manfrotto 055C with a Slik Pro Ballhead 800. This combination is much too big and heavy to be transported any longer distances with a bike or by foot.
For videography I'm considering a panning head, though I don't know which one yet. It would also be used with the bird spotting scope, which I have used with the Ballhead 800 for now. The panning head would have to be light (and not too expensive), since I don't plan to use any heavy equipment with it. A long term purchase would also be a new big tripod, which in practice would have to be of carbon fibre to be light enough for me. I doubt that I can afford it soon, though.
For video shots not taken on a tripod I bought the CamCaddie, but it turned out to be a small disappointment for me. It didn't provide any additional stability over my monopod, a Slik Monopod 350 EX, while being a lot less versatile. For the most part the video below is filmed with the camera on a monopod (no image stabilization) with only a few static parts on a tripod:
I think this monopod technique is very usable and with some practice I should also get better at it.
For videography I'm considering a panning head, though I don't know which one yet. It would also be used with the bird spotting scope, which I have used with the Ballhead 800 for now. The panning head would have to be light (and not too expensive), since I don't plan to use any heavy equipment with it. A long term purchase would also be a new big tripod, which in practice would have to be of carbon fibre to be light enough for me. I doubt that I can afford it soon, though.
For video shots not taken on a tripod I bought the CamCaddie, but it turned out to be a small disappointment for me. It didn't provide any additional stability over my monopod, a Slik Monopod 350 EX, while being a lot less versatile. For the most part the video below is filmed with the camera on a monopod (no image stabilization) with only a few static parts on a tripod:
I think this monopod technique is very usable and with some practice I should also get better at it.
Thursday, March 29, 2012
Some progress
I finished the video from the snow crust overnighter in the beginning of March some time ago. When I started editing it, I almost immediately noticed that I lacked some shootage, but I guess this is normal and is part of the learning process. Maybe a good idea would be to actually do some concrete planning. While I did have some ideas when setting out, I had no real plan. The result is this (to be viewed fullscreen with a higher video resolution):
I also lacked the suitable step-up rings for the ND filters, so the parts where there is lots of light might not have as good quality as possible. I think with an f-value of around 18, the diffraction might actually affect the sharpness even in video resolution. Since this video, made when I had owned the camera for just a few days and did not really know how to use it, I've changed my settings for the camera video mode. This should give better head room for applying small corrections in the video editor.
One of the things I'm still learning is what shutter speed to use in different situations. The general rule is to use a shutter speed twice that of the frame rate, i.e. for 25 fps the shutter speed should be 1/50, which does limit you quite a bit and necessitates the use of ND filters for many situations. I think one can get away with higher shutter speeds when an object is mainly view from or towards the camera, but for panning or objects moving across the picture a fairly slow shutter speed is necessary, especially when using a frame rate of 25 fps (and I have my reasons for that). The clip below demonstrates what happens when the shutter speed is too high. It was shot during my Tour de Pöyrisjärvi last summer, but did not make it into the video, since the movement is much too stuttery.
For video editing I've settled for the Sony Vegas Movie Studio HD Platinum 11, which I bought in a suite that gave some sound editing tools and other stuff as well. It gives a lot of features for a modest price, but takes a while to get used too. I think I'm getting the hang of it, but there are still lots of details I'm not sure about. E.g. the book DSLR Cinema mentions that transcoding (converting) the AVCHD clips made by the camera to a more editor friendly format using e.g. MPEG Streamclip is necessary to get the best color correction possibilites, something which sounds completely wrong in my opinion. This just shows that I have a lot to learn.
Finally, it is perfectly clear that YouTube pretty much destroys the technical quality of the videos. I wonder if Vimeo would give better results?
I also lacked the suitable step-up rings for the ND filters, so the parts where there is lots of light might not have as good quality as possible. I think with an f-value of around 18, the diffraction might actually affect the sharpness even in video resolution. Since this video, made when I had owned the camera for just a few days and did not really know how to use it, I've changed my settings for the camera video mode. This should give better head room for applying small corrections in the video editor.
One of the things I'm still learning is what shutter speed to use in different situations. The general rule is to use a shutter speed twice that of the frame rate, i.e. for 25 fps the shutter speed should be 1/50, which does limit you quite a bit and necessitates the use of ND filters for many situations. I think one can get away with higher shutter speeds when an object is mainly view from or towards the camera, but for panning or objects moving across the picture a fairly slow shutter speed is necessary, especially when using a frame rate of 25 fps (and I have my reasons for that). The clip below demonstrates what happens when the shutter speed is too high. It was shot during my Tour de Pöyrisjärvi last summer, but did not make it into the video, since the movement is much too stuttery.
For video editing I've settled for the Sony Vegas Movie Studio HD Platinum 11, which I bought in a suite that gave some sound editing tools and other stuff as well. It gives a lot of features for a modest price, but takes a while to get used too. I think I'm getting the hang of it, but there are still lots of details I'm not sure about. E.g. the book DSLR Cinema mentions that transcoding (converting) the AVCHD clips made by the camera to a more editor friendly format using e.g. MPEG Streamclip is necessary to get the best color correction possibilites, something which sounds completely wrong in my opinion. This just shows that I have a lot to learn.
Finally, it is perfectly clear that YouTube pretty much destroys the technical quality of the videos. I wonder if Vimeo would give better results?
Sunday, December 18, 2011
Darkness
Here we are, three days before the winter solstice, and the miserable fall just continues. Outside it is 4°C, raining and dark. Not what you would expect at this time of the year. While we might not always have winter by now, we should at least have some signs of it. Instead the long, grey and rainy fall just continues.
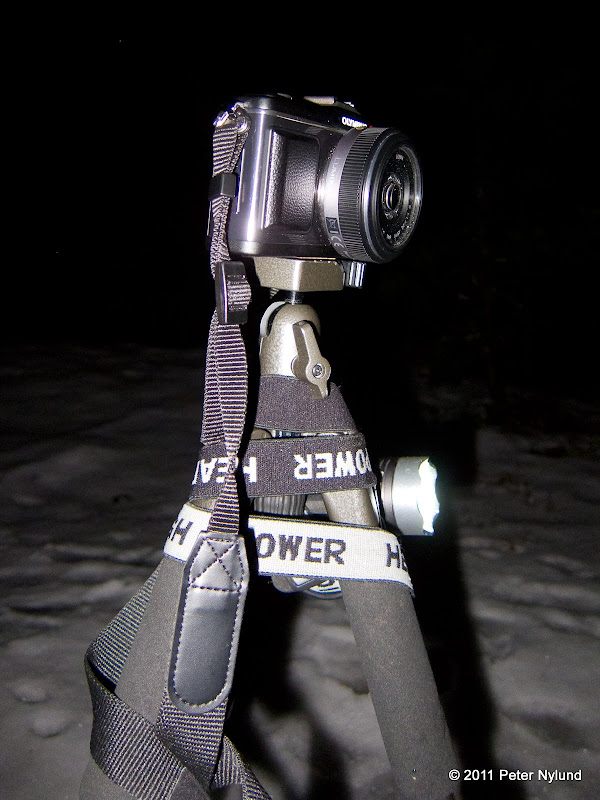
Last weekend I went on a short overnighter to take advantage of the forecasted übermiserable weather, but the weather wasn't that bad after all. I took the opportunity to check the Olympus E-P2 video performance in the darkness. With a maximum ISO in video mode of 1600 ISO it has its limitations, since the longest shutter speed possible is 1/30s when doing videos. In practice the kit lens or any other of my zoom lenses would be just on the limit, but the Panasonic 20/1.7 lenses has an advantage of 2-3 stops, so it was quite usable even without going to the highest possible ISO. I also used an additional light as seen in the following short video:
The extra light was simply a bike light (nominally some 1200 lumen with maybe 800 real lumen) fastened to the tripod.
The moon even showed itself that night, giving a fairly interesting light.

The actual video is still not ready, since I have yet to find music for it. Finding suitable royalty free music is time consuming, as I don't feel like paying much for it. Jamendo does have something as well as Kevin MacLeod, but it is still difficult to find music of the right lenght and mood. This is one of the things preventing me from getting one of the new cool GoPro Hero2 HD cameras. A GoPro would enable some interesting footage, though.
Last weekend I went on a short overnighter to take advantage of the forecasted übermiserable weather, but the weather wasn't that bad after all. I took the opportunity to check the Olympus E-P2 video performance in the darkness. With a maximum ISO in video mode of 1600 ISO it has its limitations, since the longest shutter speed possible is 1/30s when doing videos. In practice the kit lens or any other of my zoom lenses would be just on the limit, but the Panasonic 20/1.7 lenses has an advantage of 2-3 stops, so it was quite usable even without going to the highest possible ISO. I also used an additional light as seen in the following short video:
The extra light was simply a bike light (nominally some 1200 lumen with maybe 800 real lumen) fastened to the tripod.
The moon even showed itself that night, giving a fairly interesting light.
The actual video is still not ready, since I have yet to find music for it. Finding suitable royalty free music is time consuming, as I don't feel like paying much for it. Jamendo does have something as well as Kevin MacLeod, but it is still difficult to find music of the right lenght and mood. This is one of the things preventing me from getting one of the new cool GoPro Hero2 HD cameras. A GoPro would enable some interesting footage, though.
Sunday, September 18, 2011
Time lapsing
I went out for a short bikepacking overnighter this weekend and thought it would be a good opportunity to test the video capabilities of the Olympus E-P2. I also took my first try in time lapse photography. I downloaded the CHDK firmware kit and the Ultra Intervalometer script for my Canon S90. After some initial problems and misunderstandings I got it to work (you just have to wait for the lens to be retracted in playback mode before you can start the enhanced firmware). I took a small light tripod and put the S90 on it, pointed towards the sunset (and sunrise in the morning). The camera was set to take rather small 4 MP jpeg:s with a fixed white balance and exposure. The intervalometer was set to take one exposure every ten seconds.

At home I used Lightroom to batch crop the images to 16:9 proportion and exported them as 1280x720 sized pictures suitable for the lower HD resolution which the E-P2 camera uses. The resulting image sets were then converted to AVI format using VirtualDub. I then ran the resulting AVI files through MPEG Streamclip to get a compression that did not cause visible moving color gradients. Finally I used Windows Live Movie Maker put together a movie from these time lapse clips and some other shorts clips I had filmed.
The time lapses turned out fairly good, though I think the ten second interval was too long. Next time I'll have to try something shorter. There is also still a lot to learn about how to use the CHDK efficiently.
The video quality of the E-P2 does not seem to far from that of the EOS 60D, despite the lower HD resolution. The actual resolution of the 60D video was probably quite far from 1920x1080. This time I only used the fully automatic mode when filming the videos, though the E-P2 should also allow fully manual settings. I will have to learn those as well. The Windows Live Movie maker does have some limitations: When including still pictures in the video, it for some reason gets rid of any sharpness pretty efficiently. It also does not allow exporting in the lower 1280x720 HD resolution, so I had to save it in the higher resolution, which does not make sense. A better video software would be nice, but currently I'm not doing enough videos to justify it.
At home I used Lightroom to batch crop the images to 16:9 proportion and exported them as 1280x720 sized pictures suitable for the lower HD resolution which the E-P2 camera uses. The resulting image sets were then converted to AVI format using VirtualDub. I then ran the resulting AVI files through MPEG Streamclip to get a compression that did not cause visible moving color gradients. Finally I used Windows Live Movie Maker put together a movie from these time lapse clips and some other shorts clips I had filmed.
The time lapses turned out fairly good, though I think the ten second interval was too long. Next time I'll have to try something shorter. There is also still a lot to learn about how to use the CHDK efficiently.
The video quality of the E-P2 does not seem to far from that of the EOS 60D, despite the lower HD resolution. The actual resolution of the 60D video was probably quite far from 1920x1080. This time I only used the fully automatic mode when filming the videos, though the E-P2 should also allow fully manual settings. I will have to learn those as well. The Windows Live Movie maker does have some limitations: When including still pictures in the video, it for some reason gets rid of any sharpness pretty efficiently. It also does not allow exporting in the lower 1280x720 HD resolution, so I had to save it in the higher resolution, which does not make sense. A better video software would be nice, but currently I'm not doing enough videos to justify it.
Subscribe to:
Posts (Atom)